
A kitchen island can completely transform the way a kitchen looks and functions-but only if it’s incorporated into the right layout. Simply adding an island to the middle of the room isn’t enough. The most successful kitchen layouts with island are carefully planned to improve workflow, maximize storage, and create comfortable gathering spaces without restricting movement.
Whether you’re remodeling an existing kitchen or designing a new one, choosing the right layout is one of the most important decisions you’ll make. This step-by-step guide explains how to evaluate your space and select a layout that supports both your daily routine and your long-term lifestyle.
Step 1: Understand How You Use Your Kitchen
Before selecting any layout, think about how your household uses the kitchen every day.
Ask yourself questions such as:
- Do you cook daily or only occasionally?
- How many people typically use the kitchen at the same time?
- Do you entertain guests often?
- Is the island mainly for food preparation or casual dining?
- Do you need additional storage?
Your answers will help determine the size, location, and purpose of your island.
A kitchen designed around your habits will always feel more functional than one built around trends.
Step 2: Evaluate the Available Space
Not every kitchen can comfortably accommodate an island.
Proper spacing is essential for safety and convenience.
When planning your layout, allow generous walkways between the island and surrounding cabinetry so appliances, drawers, and doors can open without obstruction.
Adequate clearance also makes it easier for multiple people to move through the kitchen at the same time.
If space is limited, a peninsula or compact island may provide similar benefits without making the room feel crowded.
Step 3: Choose the Right Layout
Different kitchen configurations support islands in different ways.
L-Shaped Kitchen
One of the most versatile options.
An island adds extra workspace while maintaining an open feel that’s perfect for family interaction.
U-Shaped Kitchen
A large U-shaped kitchen often benefits from a central island that improves workflow and provides additional storage.
This layout works particularly well for homeowners who enjoy cooking.
Open-Concept Kitchen
An island naturally separates the kitchen from adjacent living or dining spaces without creating physical barriers.
It also becomes a gathering point during family events and social occasions.
Galley Kitchen
Not every galley kitchen has enough room for a permanent island.
In some cases, a movable island or rolling cart offers greater flexibility while preserving traffic flow.
Step 4: Define the Island’s Function
Every island should have a clear purpose.
Some homeowners prioritize:
- Meal preparation.
- Casual dining.
- Extra seating.
- Additional storage.
- Entertaining guests.
- Baking projects.
- Working from home.
Many families combine several of these functions into one carefully designed island.
Knowing your priorities helps determine the ideal dimensions and features.
Step 5: Plan Smart Storage
A well-designed island does much more than hold a countertop.
Consider adding:
- Deep drawers.
- Pull-out trash bins.
- Recycling centers.
- Tray storage.
- Open shelving.
- Built-in microwave drawers.
These additions improve organization while keeping frequently used items close at hand.
Many homeowners researching kitchen floor plans with island discover that thoughtful storage solutions often have a greater impact on everyday convenience than increasing the overall size of the island.
Step 6: Coordinate Materials and Finishes
Your island should complement the rest of the kitchen rather than compete with it.
- Cabinet finishes.
- Countertop materials.
- Flooring.
- Backsplash tile.
- Lighting fixtures.
- Appliance finishes.
Some homeowners prefer matching cabinetry throughout the kitchen, while others create contrast by giving the island its own distinctive color or wood finish.
Both approaches can produce beautiful results when carefully planned.
Step 7: Don’t Forget Lighting
Lighting influences both functionality and atmosphere.
Pendant fixtures remain one of the most popular choices because they provide focused task lighting while highlighting the island as the centerpiece of the room.
For larger islands, multiple pendants or a linear fixture create balanced illumination.
Combining decorative lighting with recessed ceiling lights ensures the kitchen remains practical throughout the day.
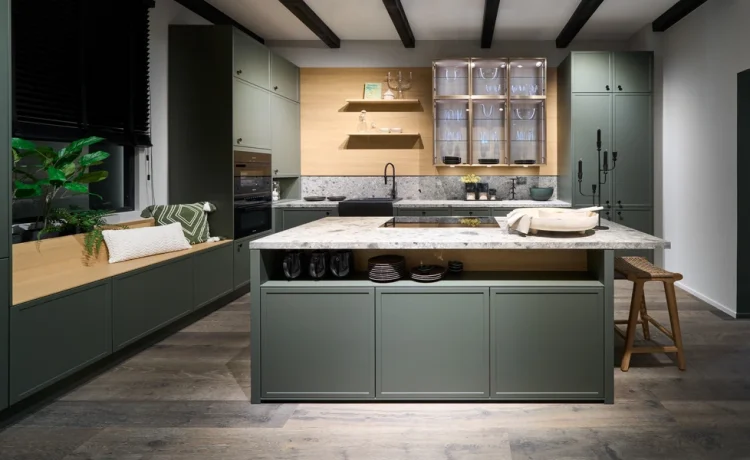
Step 8: Learn From Successful Projects
One of the best ways to refine your ideas is by studying completed renovations.
Many professionally designed california remodels demonstrate how different island layouts improve workflow, create visual balance, and support modern family living. These real-world examples can help you evaluate proportions, seating arrangements, storage solutions, and material combinations before making final decisions.
Looking at finished kitchens often reveals practical ideas that aren’t obvious in floor plans alone.
Step 9: Work With Experienced Designers
Even if you already know the style you want, professional planning can prevent costly mistakes.
Experienced kitchen designers evaluate:
- Traffic patterns.
- Appliance clearances.
- Seating comfort.
- Structural limitations.
- Electrical and plumbing requirements.
- Long-term functionality.
Their expertise helps ensure every part of the kitchen works together efficiently.
Build a Kitchen That Works for Years
The best kitchen layouts with island aren’t simply attractive-they’re designed around the people who use them every day. A carefully planned layout improves movement, increases storage, simplifies meal preparation, and creates a welcoming place where family and friends naturally gather.
Rather than choosing an island based solely on appearance, focus on functionality, proportion, and the way your household lives. When thoughtful planning is combined with quality materials and professional design, the result is a kitchen that remains beautiful, practical, and enjoyable for many years to come.


